Terrariums For Beginners


I'm not good with plants, so I jumped at the thought of making a terrarium. I mean, you buy a few succulents and stick them under glass. Right? 

Can you go wrong with succulents? I had heard that they were pretty resilient and hardly needed any attention. That's right up my alley since I've been known to be quite challenged in the gardening area. 

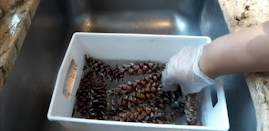
My first stop was to my local Dollar Tree where I purchased three different types of stones.  My research indicated that placing stones at the bottom of the terrarium allows for proper drainage and keeps plant roots from sitting in wet soil.  


My next stop was Home Depot. They have a nice selection of succulent plants--some for a little as two dollars. I already had potting soil in my garage, so no cost there.

So let's recap.  Here's what you'll need:

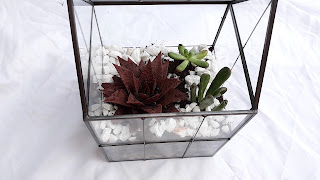
1)  Stones. Use a variety of stones if you want a more elaborate layering effect. I like the mixture of dark and light stones.  The contrast looks great through the glass terrarium!


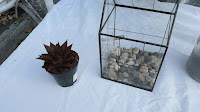
2)  Potting soil. Place a piece of weed block over the stones and then add about an inch of potting soil, or enough to sufficiently cover the roots of your plants. 


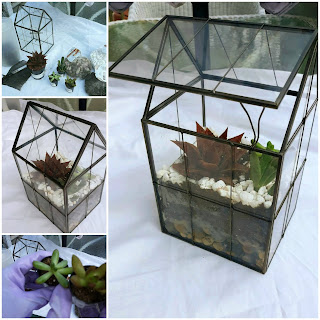
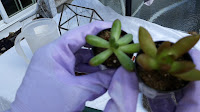
3)  Succulent plants. Add plants that have similar water and sunlight requirements. I chose a variety to cactus plants. They love the sunlight and need to be watered every 2-3 days. After you remove them from their pots, use your fingers to break apart the roots. Plant them in the soil and add more soil to ensure that the roots are covered. Finally, add another layer of stones. This is where I used the white stones from Dollar Tree.  You can repeat the layering process as much as you like, depending on the size of your vessel.


This was such a satisfying project!  My terrarium, from Ferrisland®, is shaped like a glass house.  Its pitched roof opens up and has an arm that lets the roof stay in the open position. I like that everything is contained in this glass vessel. Really cute! Some of the other highlights of the Ferrisland® terrarium are:
  • High-quality geometric shape, made of framed transparent glass.
  • Makes a great decorative piece on your desk, table, shelf, etc.


Can you say "low maintenance"? A terrarium is a great alternative to anyone who wants a little greenery in their life without the commitment of larger plants. I love it!

Use Caron10 for a 10% off coupon code.


Disclosure: Links may contain affiliates. When you buy through one of our links we will receive a commission. This is at no cost to you. Thank you for supporting Life on Greenwood and allowing me to continue to bring you valuable content


How to Clean Pine Cones in 3 Easy Steps


I'm going to show you how to clean, prepare and decorate pine cones in three easy steps. Lucky for me, I was able to find pine cones right in my backyard.  Actually, the pine cones came from my neighbors trees, but they fell into my yard. I walked around the yard and collected several that were perfect specimens. 

First, I had to clean them. They had a lot of grass and dirt on them, so I wet them a little bit to see if I could get rid of some of that gunk . During this rinsing process I noticed that the pine cones started to close up. This is natural. They usually open up again during the baking process. 

So let's talk about the cleaning process. 

One of the tutorials I researched suggested letting the pine cones soak for a couple of hours,  so soaked my pine cones for about 3 hours in a mixture of water and vinegar. Use 3 parts water/1 part vinegar.

After about one hour of soaking, wipe as much sap and dirt off each pine cone, then let them soak a while longer.

Next,  place all the pinecones on a cookie sheet lined with aluminum foil. It's important to use aluminum foil because you don't want any sap falling onto your cookware or even onto your oven.  Next, pop the pine cones into the oven.


Bake at 250 degrees for three hours or until the pine cones open. Check often. I checked on mine like every 30 minutes just to see how they were doing and to make sure that they weren't burning.

It's amazing to watch the pine cones slowly open and stretch out as the oven gets hotter! As they transform, they take on a really shiny coating.

Mine came out really well!  I'm thinking, pretty nice for something that I found in my own backyard, right? 

So let's recap:

Step 1: Soak/clean pine cones in vinegar and water

Step 2: Place pine cones on a lined cookie sheet

Step 3: Bake at 250 degrees for 3 hours or until pine cones open up

Once cooled, decorate your pine cones with paint or glitter or leave them neutral. They make great accessories in a basket, on a garland, mantel or under a holiday tree. 

I hope you get to try this.  Let me know how it turns out!


Disclosure: Links may contain affiliates. When you buy through one of our links we will receive a commission. This is at no cost to you. Thank you for supporting Life on Greenwood and allowing me to continue to bring you valuable content

"There Are No Thrift Stores Near Me" - Unpopular Opinion About Thrifting


"There are no thrift stores near me". Some of my friends have actually said this to me, but in my view, this is an unpopular opinion.

Some thrift stores like to call themselves by other names, like charity shops, knick-knack stores, bazaars or boutiques. So, what I'm suggesting is that there are probably thrifting opportunities all around you. You just might have to do a little sleuthing to find them.


The larger thrift stores, like Goodwill, Salvation Army and Habitat for Humanity ReStore are easy to spot. But your local churches and community centers often run thrift sales and flea markets. Some churches actually have their own thrift stores.

My tip: Check your local newspaper and online sites like Craigslist for thrift sales and flea markets. The finds at these out-of-the-way places are incredible!


Disclosure: Links may contain affiliates. When you buy through one of our links we will receive a commission. This is at no cost to you. Thank you for supporting Life on Greenwood and allowing me to continue to bring you valuable content

FEATURED POST

EASY HOMEMADE GRAVY RECIPE WITHOUT DRIPPINGS

Would you like to master the art of making homemade gravy without using any drippings? Everybody knows that gravy is not the easiest thing t...