

So, I've decided to do a few upgrades, starting by adding a much needed kitchen backsplash. I decided to try peel and stick tiles. There are so many styles out there. Cost and ease of installation were important to me since I would be doing this project on my own. Another thing, this townhouse is not my primary residence and I really didn't want to make a huge investment at this time.
After searching the internet, I selected Tic Tac Tiles and they graciously sent me five samples from their peel and stick collection. I had a tough decision to make! I polled my social media followers for feedback on which way I should go. The response was overwhelmingly positive! I chose the Metallic Marble White peel and stick tile. Great decision!
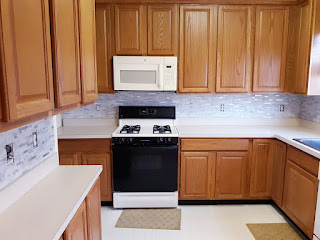
So how did I do?

Tips - Things You Must Consider
- Clean your walls thoroughly with a degreaser. If you have stuck-on grease spots, use a steel wool pad or something similar to scrape off the gunk. A clean surface is a must in order to get maximum adhesion!
- Use the proper tools. Scissors, level, ruler or measuring tape and a pencil are about all you will need to install vinyl peel and stick. For more durable peel and stick tile like Metallic Marble White tiles, I would recommend a utility knife instead of scissors.
- Before applying a sheet of tile to the wall, peel the paper backing half way. This will give you a little more control so the entire sheet of tile doesn't adhere to the wall before you have it properly lined up. It's really sticky! Slowly peel back the rest of paper covering as you adhere the tile to the wall. In the case of Metallic Marble White, one end of the sheet of tile simply interlocks and snaps into place.
The Hard Part - Cutting Around Outlets

The Good Part - No Grouting
Use code: LIFEONGREENWOOD15 for 15% any tile style. Valid until 3/27/22 at midnight.
Disclosure: Links may contain affiliates. When you buy through one of our links we will receive a commission. This is at no cost to you. Thank you for supporting Life on Greenwood and allowing me to continue to bring you valuable content.

No comments:
Post a Comment