Dollar Tree Cleaning Hack For Scuff Marks on Walls


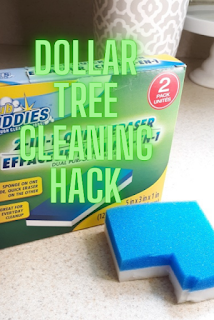
I have a quick Dollar Tree hack! You know those scuff marks that we get on the walls all around our home? Well, I tried a Dollar Tree product to see if it would get rid of those scuffs.

Here's what happened. I bought the 2-IN-1 QUICK ERASER from Dollar Tree. It's a two-pack sponge that's supposed to be great on tough jobs. Each 5" sponge is about 1" thick with a white scrubbing side and a softer blue side.


I didn't expect it to work, so I was pleasantly surprised when it did. 

I tried it out on a few scuff marks on my kitchen walls. After wetting the sponge with water, I gave each scuff mark and few rubs with the white side of the sponge. The scuff marks  disappeared! I wiped the area with a dry cloth and that was that. Amazing!

But here's the hack. Cut your sponge into smaller rectangle pieces and only use what you need. Why waste a whole sponge for a small job, right?

Good one, Dollar Tree!


Closet Clean-out Tips


 I am by no means a professional organizer, but I sometimes play one on social media. But seriously, let's talk about our overstuffed closets and ways to pare down.

I like to go through my closets a few times a year and weed out clothing that no longer fits or that I haven't worn recently. I also like to look around my home and do the same thing.

Then I consciously decide what I want to do with the weeded out pieces. As for clothing, I have to really convince myself to part ways with certain pieces. 


As I touch each item, I think about how I wore it, how it made me feel, where I wore it last and the reaction from people who saw me wearing it. I have to admit, I get a little melancholy. It's definitely a psychological tug of war! 

Can you relate?

QUESTIONS TO ASK YOURSELF AS YOU DECLUTTER

So, are you in the middle of cleaning out your closets or just thinking about it?   Are you wrestling with yourself about letting go of things? I hear ya! 

You can expedite your closet clean-out process if you ask yourself a few questions along the way. Here are the questions I grappled with:

  1. Does this still fit?
  2.  Is it still my style? 
  3. Is it damaged or even wearable? 
  4. Will I ever wear it again? 
  5. Can someone else use it? 
  6. Should I sell it, donate or discard it? 

Asking yourself these questions while you're going through your closets should add a little structure to your process and help you make it to the end. 

I hope this helps!


Disclosure: Links may contain affiliates. When you buy through one of our links we will receive a commission. This is at no cost to you. Thank you for supporting Life on Greenwood and allowing me to continue to bring you valuable content

What Is the Difference Between Goodwill Retail Store and Goodwill Bins?


Did you know that Goodwill Industries has stores known as Goodwill Outlets? Regular thrifters refer to these stores as "The Bins" because of the big storage containers or bins used to display clothing. Let me paint you a picture.

The Bins is really a warehouse.--a wide open warehouse full of clothing, home accessories, electronics and furniture. Clothing is sold by the pound. My local Bins sells its clothing for $1.49 per pound. 
 
When you arrive at The Bins, you will see that it is totally different from the Goodwill retail stores. Unlike the retail stores, nothing is on hangers or garment racks at The Bins. Clothing is wheeled into the warehouse in gigantic bins. You will finds rows and rows of bins and people digging through them like maniacs. 


On my maiden trip to The Bins, I was somewhat prepared, but not really. I had heard so many stories about the fights and other drama, so I was ready for anything. 

Well, when I arrived, there were people digging in the bins and throwing clothing back or into their shopping carts as if their lives depended on it. I was a little intimidated. I guess I was moving too slowly because people were reaching around like I was in the way. It was wild!

I was watching everything around me. It reminded me of my first day of junior high. My older brothers had told me so many stories about junior high school, like having lockers, changing classes, shop class, and lunchroom fights, that I was hyper-vigilant and scared at the same time. I'm here to report that my junior high school experience wasn't half as bad as my brothers had reported. Thank goodness!

Anyway, after about 15 minutes of sifting through clothing, I noticed a staffer on my row was consolidating clothing into a single bin.  I learned that he was doing this so that he could make room for fresh bins of clothing and hard goods. And this scene repeated itself over and over again throughout the warehouse, about every thirty minutes or so. 

MAJOR PROTOCOL AT THE BINS

Here's the clencher. There is one major protocol that must be followed as staff brings out fresh bins. As the new bins roll in, an announcement is made that no one should touch the bins until all bins are in place.  This mean ALL bins. 

Thrifters must step out of the way and stand back. This is important to know. 

I witnessed a heated interaction between staff and a thrifter who refused to follow the rules.  She began digging in the bins after being asked several times to wait.  It was ugly! She was eventually escorted out of the warehouse.

I don't know if this was her first trip to The Bins, but I'd say it did not end well for her. As for me, I learned a lot that day.

Have you ever been to the Goodwill Outlets? What was you experience? Drop me a line if you can relate to my story.


Disclosure: Links may contain affiliates. When you buy through one of our links we will receive a commission. This is at no cost to you. Thank you for supporting Life on Greenwood and allowing me to continue to bring you valuable content





3 Things You Should Wash At Least Once a Week


Most homemakers swear by a housekeeping routine that helps them keep the dust and clutter at bay. Some people have to do a little pick up each day to stay afloat. I remember those days when I had a little one under foot. Keeping up with the clutter was quite a challenge!

These days, I get by with a weekly detail that gives me peace and keeps me from freaking out. Mine is a simple weekly routine and should not be confused with a deep clean, which I usually save for twice a year. 

During my weekly routine, I wipe down all the surfaces in my home, empty the trash bins and tidy my bathrooms. This is more of a maintenance strategy that keeps things in my home from becoming out of control. 


The most important part of my weekly routine is laundry. While I might wait to get a full load before I'll wash sweaters or blouses, there are certain items that I wash every week without fail.

WHAT I WASH ON A WEEKLY BASIS

So, each week, I strip my bed and wash everything on a hot water cycle.  I've been doing this for years. It's even more important to adopt this practice if you're co-sleeping with a spouse or partner. Why?


Did you know that your body sloughs off hundreds of millions of dead skin cells each day? Many of those skin cells end up in your bed and on your pillow where they are eaten by tiny dust mites. Left unchecked, these dust mites and their droppings can trigger all kinds of allergies. 

I don't know about you, but that grosses me out! 

The best way to combat this is to wash your bedding in hot water at least on a weekly basis.  In my home, I have 3 things that I wash at least once a week.

Here is my "must wash weekly" list:

1)  Bedding: Sheets, pillow cases, blankets, comforter, mattress protector

2)  Bath and Kitchen Towels

3)  Underwear

I created my "must wash weekly" list based on items that I felt were havens for dust mites, bacteria and odor.  


It might not be possible to totally eliminate bacteria and dust mites, but a little hot water goes a long way.  And staying on this regimen gives me piece of mind.  Besides, who doesn't love sleeping between freshly washed sheets?

Do you have a cleaning routine? Please leave me a comment and share how you keep your home in order.


Disclosure: Links may contain affiliates. When you buy through one of our links we will receive a commission. This is at no cost to you. Thank you for supporting Life on Greenwood and allowing me to continue to bring you valuable content


Re-Seasoning Your Cast Iron Grill - Beginner's Guide


My son calls himself the Pancake King. As a bachelor, he cooks what he likes. And what he likes... a lot, is pancakes. Unfortunately, he did not have the proper tools fit for king. 

Using a standard frying pan that could only fit maybe two good-sized pancakes at a time, he had his work cut out for him. This was no way for a king to live, so we helped him out. 


We gifted him with a Pre-seasoned Cast Iron Double Burner Reversible Grill/Griddle. That's a mouthful, isn't it? But it's the best thing since sliced bread! He's flipping 6-8 pancakes at a time. 

Because the grill covers two burners, we were concerned about heat distribution, but this pre-seasoned grill distributes heat evenly.  It cleans right up with mild soap and water.  I think his life just got a whole lot easier. 

If you're wondering what's meant by "pre-seasoned", let me break it down.

What is Pre-Seasoned Cast Iron?

Pre-seasoning is the process of conditioning cast iron surfaces with oils as a means of providing additional protection from rusting. It is sometimes done by the manufacturer, but it is widely recommended that you as the purchaser do it yourself and repeat the process as your cast iron cookware ages. 

How Do I Re-Season My Cast Iron Grill?

So, I re-seasoned our grill because I really didn't know to what extent it had been seasoned by the manufacturer. To re-season our grill, I followed these steps:
  • Coat both sides of the grill with cooking oil. I used vegetable oil.
  • Place in the oven at 375 degrees ( Use a cookie sheet on the rack below or cover the rack with aluminum foil to catch oil drips). Oil will drip, trust me!
  • Bake for one hour. Remove from oven and let cool.


It turned out great! I love the sheen and I hope my son has many years of pancake-making on  his new reversible cast iron grill/griddle!

If you have experience with pre-seasoned cast iron and if you've ever re-seasoned cast iron cookware, drop me a line!


Disclosure: Links may contain affiliates. When you buy through one of our links we will receive a commission. This is at no cost to you. Thank you for supporting Life on Greenwood and allowing me to continue to bring you valuable content


Outdoor Fire Pit Ambience - Propane Fire Pit Review


It's a great time to try an outdoor firepit! I've wanted one, like, Forever! Last summer I broached the subject to hubby that I wanted to try a DIY brick firepit. I even went so far as to research the types of bricks to use; the size of the firepit and where to construct it in our backyard.

My biggest problem with putting a firepit in our backyard, is placement. Ideally, I would have located the firepit right in the middle of our yard, but there was one thing holding me back. A huge tree.

If you saw my DIY rock garden video, you might have seen glimpses of the tree in question.

This tree was not only an obstacle for my firepit placement, but it provided so much shade that we ended up with huge bare spots all around it. I can't tell you how many times we have talked about cutting it down. Okay, only I was talking about cutting it down, but hubby thought he would make one last ditch effort to grow grass around it. And with prayer and a lot of TLC, the grass grew!

So what about my outdoor firepit?

Thank goodness I found a sleek firepit that's portable enough to fit on my backyard deck. This one is powered by propane which attaches to a line.  It's so simple to operate. Ignition is as easy as pushing and turning a knob.  The flame is adjustable and can be set at high or low. It's smokeless and ash-free.  It's a great alternative from the wood-burning outdoor firepits.  


Our new firepit adds instant ambience to our outdoor space.  On chilly evenings, we've cuddled on our deck, warmed by the flames and lava rocks from our new firepit. When not in use, we just cover our new firepit with its weatherproof cover and set it aside.  We love it! It's a great alternative to the wood-burning firepit or the in-ground DIY that I originally planned.

If you love outdoor firepits or bonfires, drop me a line! I'd love to hear from you!


Disclosure: Links may contain affiliates. When you buy through one of our links we will receive a commission. This is at no cost to you. Thank you for supporting Life on Greenwood and allowing me to continue to bring you valuable content

FEATURED POST

EASY HOMEMADE GRAVY RECIPE WITHOUT DRIPPINGS

Would you like to master the art of making homemade gravy without using any drippings? Everybody knows that gravy is not the easiest thing t...